Classic Macintosh Hack
(a.k.a. ResEdit it to look like MacOS 8!)
This tip applies to 68000-based Macintoshes running System 7.x.
First, and most importantly, make a copy of your System file! This is very important, as you need an original to go back to if you make a mistake. Also, download copies of ResEdit 2.1.3 and Aaron 1.5.1 from the Internet and put them on your hard drive. Unfortunately, Aaron doesn't run on 68000 machines (it needs a '020 or better to run), so we'll have to do things the hard way.
Let's do the easy hacking first. Copy the Espi Sans 10 font (keep the original where it was) into your fonts folder and set it as the font for the Finder in the Views control panel. (Ala the Aaron instructions.) Next, click on the "Past this onto your hard disk" icon, get info (command-I), and click on the icon in the Get Info window. Copy this (command-C) and get info on your hard drive. Click on the hard drive's icon in the Info window and paste. Viola! A new 3D OS 8-style icon! (You can also rename your System Folder "MacOS Folder.")
Now for some harder stuff. Make a copy of the Aaron folder, and remember from now on to work only with the copy. (We don't want to mess up our original.) Also, make a copy of your System file and only work with the copy. We need to be able to restore the un-hacked version if something goes wrong. Start ResEdit and open up the ~Aaron extension that you just copied. Find the two resources entitled "ICN#" and "ics#". Shift-click on these two resources to select them both, and copy. Close the extension, and open the copy of the System file. Paste, and click "Yes" in the resulting dialog box to replace your old icons. Now the edited System file contains 3D icons!
Finally, the hardest part. Start ResEdit and create a new file, entitled "System Font." Also, open the copy of the ~Aaron extension that you made earlier. Find the "NFNT" resource and copy and paste it to your new file. Double click on the new resource, select NFNT number 16301 (remember that number) and choose "Get Resource Info" from the Resource menu. Change the name of the NFNT to "System Font". Now, close the ~Aaron extension and open up the copy of the Espi Sans 10 font file. Click on the "FOND" resource and copy and paste it into your new System Font file. Double click on this new resource, select FOND number 9840, choose "Get Resource Info," and change the name to "System Font" and the ID number to 99. (99 is the number that worked for me, you may need to use a different one depending on the fonts used on your system.) Now double click on FOND ID 99 (the one you just edited the info of) and find the line "Family ID." Change this number to 99. Scroll down to the line entitled "Font Size," and change that value to 12. Keep the "Font Style" at zero and change the Res ID to 16301, the number you memorized earlier. Next, choose "Get Info for System Font" from the File menu and change the file type and creator to "ffil" and "movr", respectively. Keep this file open and open the copy of the System file that you made earlier. Copy the "FOND" resource from the "System Font" file and paste it into the System file. Double click on the "FOND" resource in the System. Find FOND ID 0, named Chicago, and delete it. Find the FOND ID 99, the one you just pasted in, and use "Get Resource Info" to change its ID number to 0. Finally, open the sole "FRSV" resource and change the first value, a 12, to 12684. (This number comes from 99 [the ID number] x 128 + 12 [the font size].)
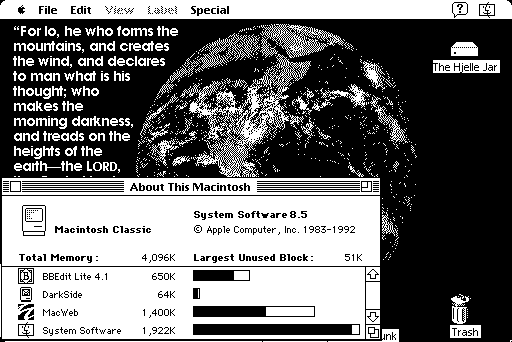
To use this edited System and new font, drag the font into your Fonts folder. Open up the System Folder, and drag out the original System file and drag in your edited file. Now, if you restart your computer, you will have a close approximation of the OS 8 "Platinum Appearance." Have fun, and wow all your Windows friends!

A screenshot of the final result.
 |
|
| Back to Writings | Home |